Active Directory Integration
Active Directory (AD) integration populates your xAssets database with location, department, user, and computer information from your AD environment. Running this integration before network discovery gives discovery a head start -- locations are pre-populated, and discovered computers can be matched to their AD records.
What AD Integration Imports
AD integration brings four types of data into xAssets:
| Data Type | Source in AD | How It Is Used in xAssets |
|---|---|---|
| Location Hierarchy | Organisational Unit (OU) structure | Populates the location tree for asset assignment |
| Departments | User department field | Creates department records for departmental reporting |
| Users/Custodians | User objects (name, email, location, department) | Populates the Custodian table. Specific OU paths can be provided to limit which users are imported |
| Computer Records | Computer objects in AD | Creates asset records for each computer, with associated departments and locations |
Tip: If your AD contains stale computer objects (machines that no longer exist), you can configure the integration to skip the computer import step, or provide specific OU paths to limit which computers are imported.
Prerequisites
- During installation, AD integration should have been configured with the AD server address, root OUs, and domain names
- If you have multiple AD servers (forests or domains), each can be configured for integration
- The service account running xAssets needs read access to the relevant AD OUs
Running AD Integration
Manual Execution
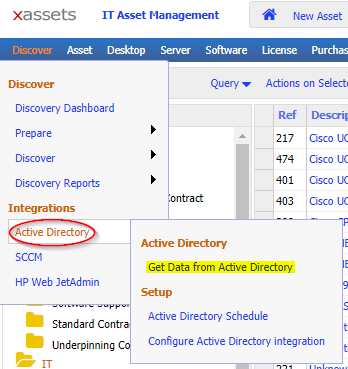
- Navigate to Discover > Active Directory > Get Data from Active Directory
- The integration runs and imports data according to the configured settings
Scheduled Execution
Once the initial AD integration has been verified, schedule it to run regularly (e.g., daily or weekly) so that new users, department changes, and location updates are automatically reflected in xAssets.
Configuring AD Integration
To enable, disable, or adjust the four import options:
- Navigate to Discover > Get Data from Active Directory
- The configuration screen shows which data types are enabled
- Adjust settings as needed (e.g., disable computer import if your OUs contain stale data)
Tips
- Run AD integration before your first network discovery -- this pre-populates locations and users, making discovery results more meaningful
- After running AD integration, review the location hierarchy and departments to ensure they match your real-world structure
- If locations from AD do not match your physical locations, you can edit or reorganise them in xAssets without affecting the AD source
- Schedule AD integration to run before scheduled network discovery, so discovery has current user and location data to work with
Related Articles
- Setting up Reference Data — managing locations, IP ranges, and other classification data
- Discovering the Network — running network discovery after AD integration
- Preparing for Discovery — configuring IP ranges and locations