Setting up Reference Data
Reference data provides the classification framework for your assets -- locations, departments, categories, cost centres, suppliers, and custodians. Setting up reference data before discovery ensures that discovered assets are automatically assigned to the correct organisational structure.
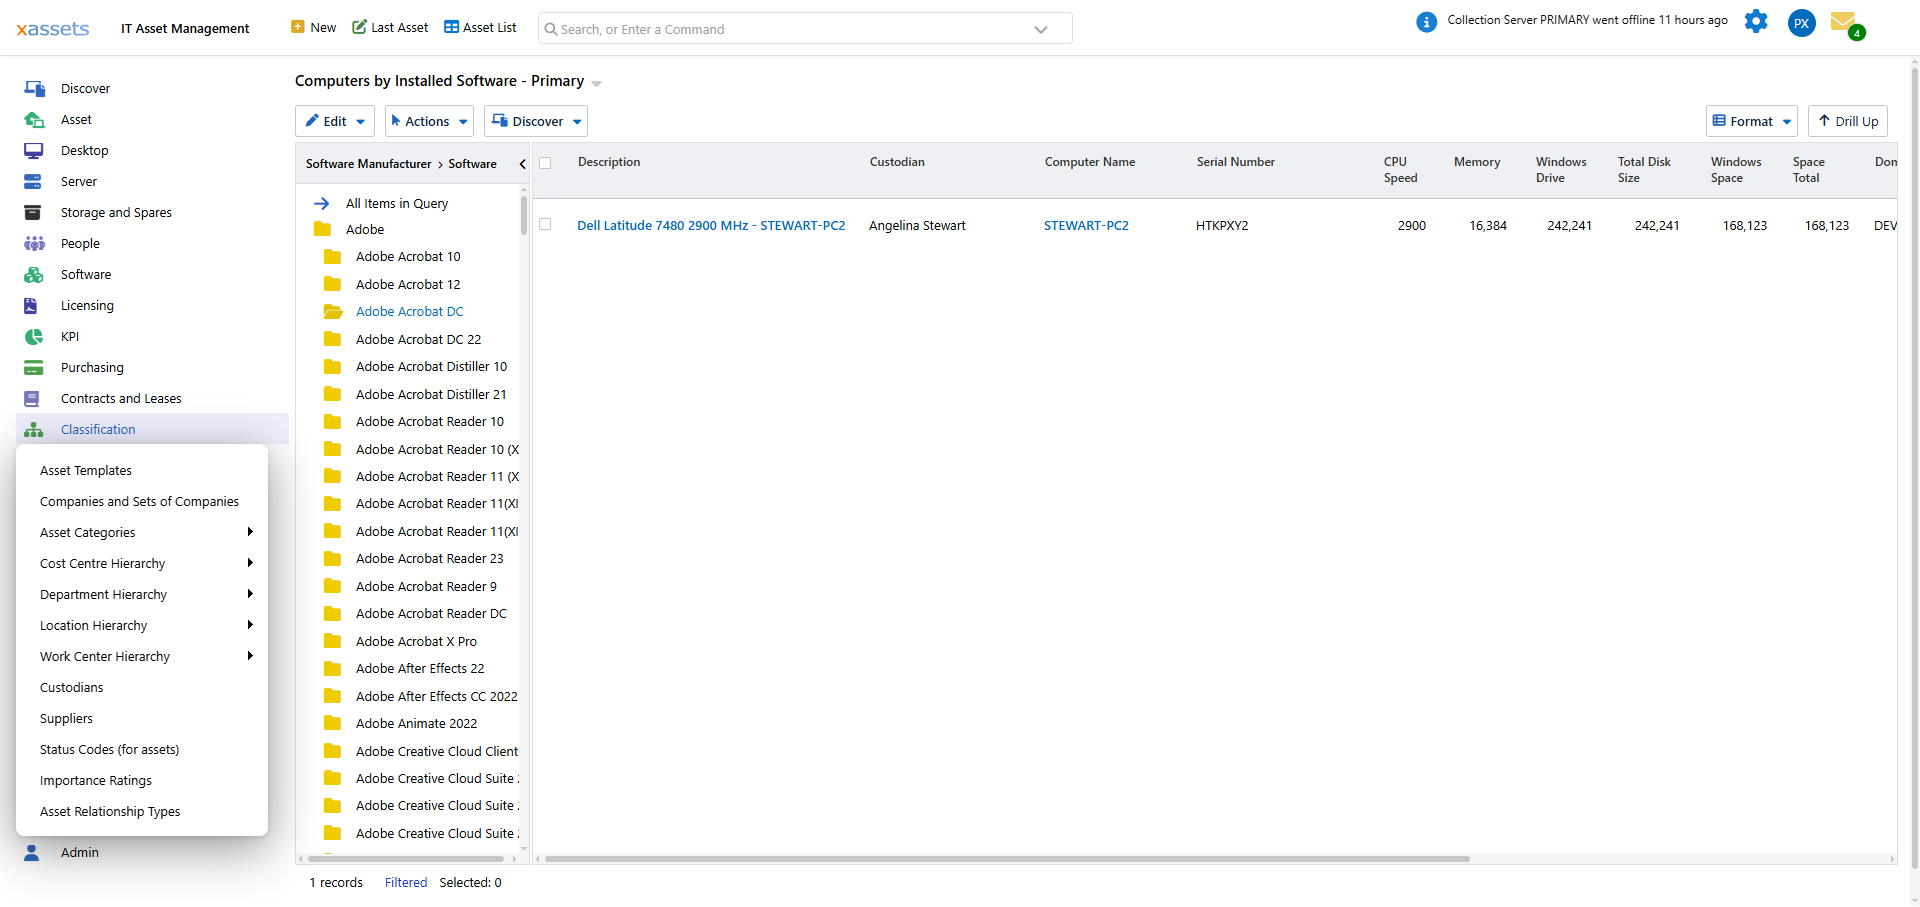
Most reference data is managed from the Classification icon in the left navigation. It groups all of the classification screens together: Location Hierarchy, Department Hierarchy, Cost Centre Hierarchy, Work Center Hierarchy, Asset Categories, Companies and Sets of Companies, Custodians, Suppliers, Status Codes, Importance Ratings, and Asset Relationship Types.
Location Hierarchy
Locations represent the physical places where assets reside. While you can discover the network without setting up locations first, having locations in place enables:
- Discovery "by location" (scanning all IP ranges associated with a location)
- Automatic location assignment as assets are loaded into the database
- Location-based reporting and dashboards
Managing Locations
Navigate to Classification > Location Hierarchy to view and manage locations. This opens a Lookup Location dialog showing the location tree:
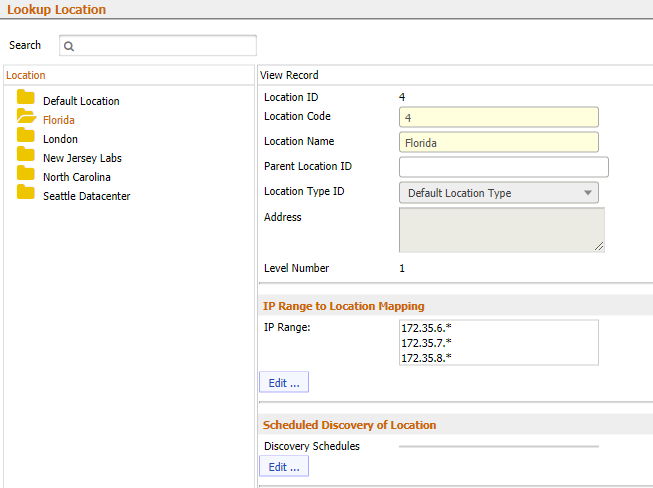
The location hierarchy can have unlimited depth, although the default Active Directory integration is configured to import four levels. Click Show List in this dialog to switch to a flat grid of every location, useful for bulk review or export.
To create a new location:
- Click New at the bottom of the dialog
- Enter the location name and details
- Set the Parent Location field to position it in the hierarchy
- Click OK to save
Additional location attributes (address, location type, level number, IP range mapping, scheduled discovery) can be recorded by editing an existing location record. The quickest way to reach a location's edit form is to open any asset assigned to that location, click the Location value on the asset's Edit Asset tab, and then click Edit... next to the location in the resulting list:

The edit form shows Location ID, Location Code, Location Name, Parent Location, Location Type, Address, and Level Number, plus two related sections on the same form: IP Range to Location Mapping (with an Edit button that opens the IP ranges assigned to this location) and Scheduled Discovery of Location (Add/Edit buttons for a discovery schedule tied to the location).
Tip: Locations can also be imported from a spreadsheet or other data source, and can sometimes be imported as part of an asset import that contains location information.
IP Range to Location Mapping
Once locations exist, map IP address ranges to locations so that discovery can assign assets to the correct location automatically.
Navigate to Discover > Manage IP Ranges and Locations:
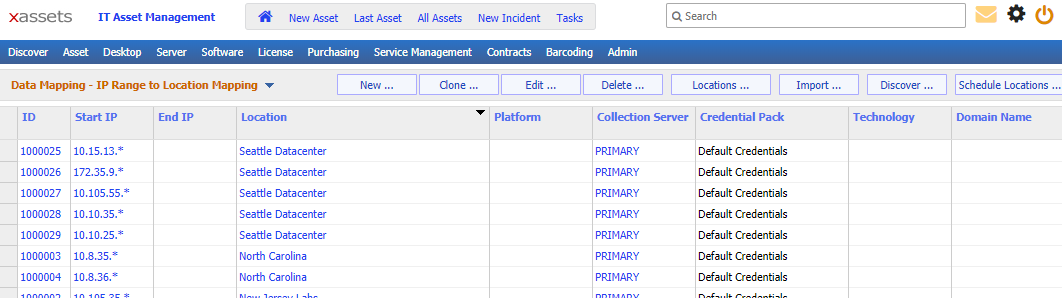
In the above example:
- A PC with IP address
10.10.25.66would be automatically assigned to "United States > Seattle Datacenter" - A PC with IP address
10.11.14.77would be assigned to "United Kingdom > London"
Collection Servers
If a location is served by a separate discovery Collection Server, specify it in the Collection Server column of this screen. This tells the system which Collection Server handles discovery for each IP range.
Other Reference Data
The rest of the reference data lives together under the Classification icon near the bottom of the left-hand navigation:
| Data Type | Menu Item | Purpose |
|---|---|---|
| Categories | Asset Categories > Categories | Asset types (Desktop, Laptop, Server, etc.); a second item, Category Groups, lets you group categories together |
| Companies | Companies and Sets of Companies | For multi-company installations representing different business entities |
| Cost Centres | Cost Centre Hierarchy | Financial classification for cost allocation and budgeting |
| Departments | Department Hierarchy | Departmental reporting and ownership |
| Locations | Location Hierarchy | Physical location of each asset (see above) |
| Work Centers | Work Center Hierarchy | Sub-location groupings used for internal service/repair routing |
| Custodians | Custodians | Users, technicians, asset owners -- in many installations this stores the entire workforce. Also reachable from the People menu |
| Suppliers | Suppliers | Vendors who sold or provided the asset |
| Status Codes | Status Codes (for assets) | Custom in-service / disposed / on-order style status values |
| Importance Ratings | Importance Ratings | Risk management classification for business-critical assets |
| Asset Relationship Types | Asset Relationship Types | Classification of inter-asset relationships (parent-child) |
| Asset Templates | Asset Templates | Pre-filled defaults used when creating new assets of a given type |
Categories, Cost Centre Hierarchy, Department Hierarchy, Location Hierarchy, and Work Center Hierarchy each open as a flyout with two entries: the hierarchy/list itself, and a second "Types" entry for defining the type values that records in that hierarchy can be assigned to (Location Types, Department Types, Cost Centre Types, Work Centre Types).
Further classification data, such as Specification Data collected by discovery, may not appear in this menu but is available for editing from the asset entry screen.
Tips
- Set up the location hierarchy first, then map IP ranges, then run discovery -- this order gives you the best results
- If AD integration has already populated locations, review and adjust them before mapping IP ranges
- More complex location assignment policies can be introduced with further configuration -- consult the Configuration Guide
- Keep reference data clean and deduplicated -- duplicate locations or departments cause reporting confusion
Related Articles
- Active Directory Integration - pre-populating locations and users from AD
- Discovering the Network - running discovery after reference data is in place
- Preparing for Discovery - detailed IP range configuration