Discovering the Network
Once you have completed the prerequisite setup steps, you are ready to run network discovery. This page provides a quick-start guide for launching your first discovery scan and monitoring its progress.
Prerequisites
Before running network discovery, ensure these tasks are complete:
- Product installation and basic configuration -- xAssets and the Collection Server are installed and running
- Active Directory Integration (optional) -- run the AD import to pre-populate locations, users, and computer records (see Active Directory Integration)
- Location hierarchy -- locations have been entered or imported and reviewed
- IP range mappings -- locations have been associated with IP ranges (see Setting up Reference Data)
Accessing Discovery
All discovery actions are accessible from the Discover menu:
You can also access these actions from the Discovery Dashboard (Discover > Discovery Dashboard):

Discovery Options
Discover a Location
This option presents a dialog allowing you to select one or more locations. Discovery scans all IP ranges associated with those locations.

Note: This option only works if locations have been set up correctly and assigned to IP ranges.
Discover a Computer or IP Range
This option lets you enter one or more IP addresses, ranges, or computer names directly:
Choosing Credentials
- To use the Windows logon credentials of the batch processor service, select Default Credentials on server <CollectionServer>
- To use different credentials, select a Credential Pack from the drop-down (see Credential Packs)
Note: When different credentials are specified, the discovery process runs in a hidden window (hidden window station) on the application server and is not visible on the desktop.
Monitoring Progress
From the Collection Server
Each discovery option runs a discovery script behind the scenes. On the Collection Server (usually the application server), start the Collection Server Viewer:

Right-click and choose Run as administrator. The viewer shows real-time progress for the current script. If the application is already running, look for its icon in the system tray ![]()

The discovery process runs as a Windows service -- the viewer simply displays data from the local database.
From the Web Interface
Progress is also visible in the browser:
- From any dashboard, check the batch job status area
- Navigate to Admin > Batch > Recent and Running Batch Jobs for a detailed view
After Discovery Completes
Once discovery finishes scanning, a separate process loads the discovered data into the xAssets SQL Server database. In smaller installations this happens immediately; in larger installations (typically more than 1,000 assets), loading may be configured to run overnight.
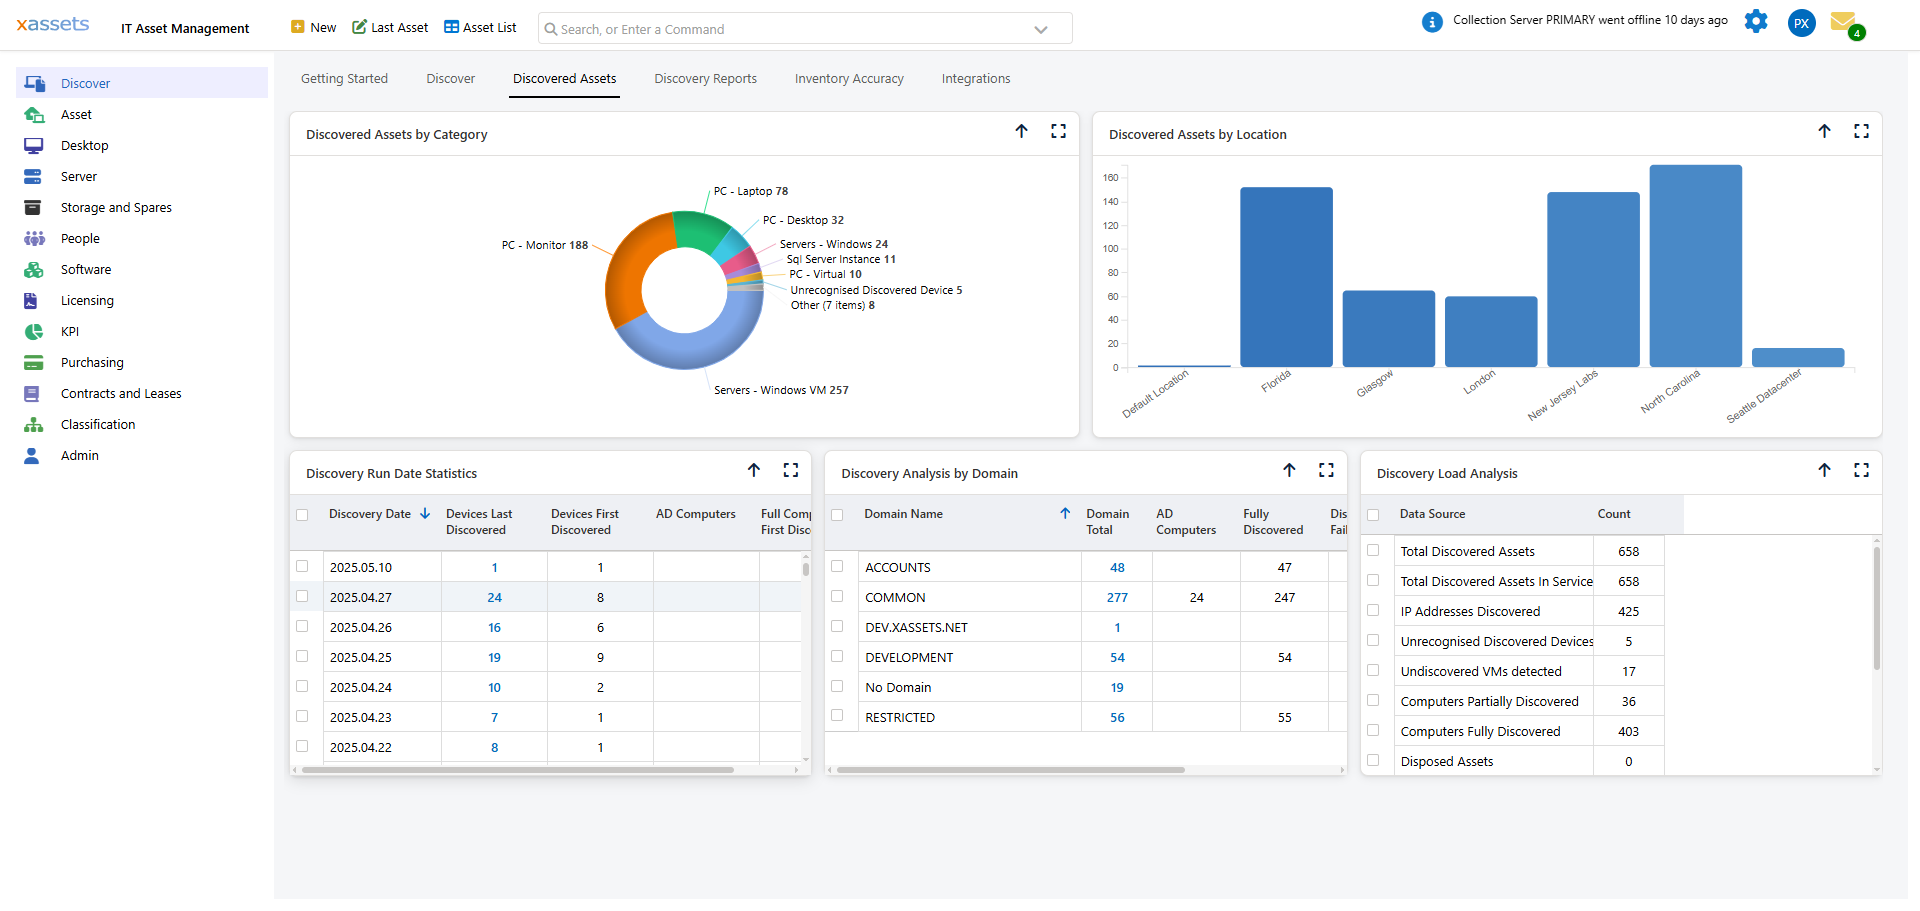
After loading completes, discovered assets appear in:
- The Asset Inventory Dashboard
- All relevant queries and reports
- The Discovery Dashboard under "Discovered Assets"
Tips
- Start with a single location or small IP range to verify everything works before scanning your entire network
- If discovery appears to run but finds nothing, check the PCAnalyser share permissions and Credential Pack access (see Analysing Discovery Problems)
- Schedule regular discovery runs once you have confirmed the initial scan works correctly
Related Articles
- Running Discovery — detailed discovery instructions
- Credential Packs — managing authentication
- Loading Discovery Data — importing results into the database
- Analysing Discovery Problems — troubleshooting