05 September 2024
Will Islwyn Lambert
This post explains how to convert from using Excel to track your asset register, to using asset management software.
We offer a cloud hosted free edition, which can support up to 1,000 fixed assets.
Excel spreadsheets have long been the go-to tool for managing assets, budgets, and metrics in organizations.
However, for comprehensive asset management, switching to a dedicated asset management software like xAssets is essential.
Problems with choosing Excel to manage your assets include: Manual data entry, lack of real-time collaboration,
lack of validation of asset data,
difficulty in tracking changes,
failing to centralize asset management,
and the risk of input errors can lead to costly mistakes.
Studies show that up to 88% of spreadsheets contain errors. When managing your company's valuable assets, can you afford to rely on a system prone to such risks?
If you've been using Excel to manage your assets—whether it's software or physical assets, you might have already faced some challenges.
Discrepancies in data, lack of accountability, version mix-up, no backups, no reports, and difficulty in maintaining accuracy are all common issues.
With no built-in way to track changes or manage user permissions, ensuring the integrity of your asset data can be an uphill battle.
Over time, this can lead to loss of productivity, frustration among team members, and even financial losses due to inaccurate asset management.
This is where xAssets can help. By switching to an asset management platform like xAssets, you can automate workflows, saving time and money,
and access real-time data, all while reducing the margin for error. Furthermore, xAssets is specifically designed to manage large sets of assets,
streamlining your processes and giving you complete visibility into every aspect of your assets' lifecycles—from acquisition to disposal.
By implementing xAssets, companies not only eliminate inefficiencies but also gain better control and security over their data.
If the thought of transitioning from Excel to xAssets seems daunting, don't worry. We've broken it down into three simple steps to make the process as smooth as possible.
If you don't have an xAssets instance, you can use the contact page
to get a free instance, which licenses 100 IT assets and 1,000 fixed assets
The Benefits of Switching to xAssets
Let's take a moment to understand why making the switch is worth it. xAssets offers a complete set of tools tailored to the unique needs of businesses, large or small.
It's not just about managing your current assets; xAssets enables you to future-proof your processes and scale as your company grows.
Below are some key reasons why you should opt for xAssets over Excel to track your asset data:
- Multiple users can use it in parallel from anywhere. The system works from cell phone and from any browser
- Accurate Record Keeping: xAssets offers a centralized system for asset management, allowing you to maintain a detailed history for each item. From the moment of purchase to disposal, every action is recorded, making it easy to track usage, maintenance, and location over the asset's lifecycle. Unlike Excel, there's no need to shuffle through different versions to find what you're looking for.
- Enhanced Collaboration: With xAssets, all your asset data is in one place, providing a single source of truth. This means your entire team can work together in real-time, without the risk of working on outdated versions of a spreadsheet. Custom user permissions also ensure that everyone has access to the information they need—nothing more, nothing less. You can easily assign roles, ensuring that sensitive data is protected, and there is clarity on who is responsible for what.
- Real-Time Reporting: Say goodbye to outdated reports. With xAssets, your data is always up-to-date, allowing you to generate accurate reports on the status of your assets whenever you need them. Plus, with the ability to audit changes, you can quickly identify discrepancies and hold the right people accountable. Real-time reporting also enables faster decision-making, helping your business stay agile in a competitive market.
- Automation of Key Processes: Beyond data entry, xAssets enables you to automate repetitive tasks such as scheduling maintenance, sending notifications for renewals or upgrades, and even generating asset depreciation reports. Automation minimizes the risk of human error and allows your team to focus on higher-value tasks, increasing overall productivity.
- Scalability: Whether your business is just starting out or expanding rapidly, xAssets is built to scale. Excel can quickly become unwieldy as your asset list grows, leading to longer processing times and more room for mistakes. On the other hand, xAssets handles large datasets effortlessly, ensuring performance and reliability as your organization grows.
Importing data into xAssets
Now that you're aware of the benefits, let's walk through the process of migrating your asset data from an Excel spreadsheet to xAssets. The process may seem technical, but with the right preparation, it can be smooth and hassle-free.
When migrating your data to xAssets, there are three ways to approach the import process, depending on your specific needs and the complexity of your data:
- Use a "standard import" within xAssets
- Build your own import
- Ask us to load it for you!
Standard imports are very easy to do if the sample format fits your data.
This method involves downloading a sample spreadsheet from xAssets and reformatting your data to match the predefined column headings and
order provided in the template. It's a quick and efficient way to import your data, especially if your asset information is relatively straightforward and
closely aligns with xAssets' default fields.
Custom imports allow you to build a new import matching the format of your existing data. Additional scripts can be added
to perform data cleansing, validation, recognition and transformation.
Prepare your Data
Regardless of the import method you choose, taking the time to clean up your Excel file beforehand will save you time down the road:
- Remove duplicates: Ensure that each asset is listed only once.
- Standardize entries: Make sure all entries are consistent (e.g., using the same date format, standard naming conventions).
- Normalize descriptions where they are different but mean the same thing, like location names "New York Office", and "New York"
- Organize columns: Clearly label each column (e.g., Asset Name, Serial Number, Purchase Date, etc.).
- Check for missing or outdated information: Ensure all required fields are filled out accurately and update any old or missing information.
By preparing your data thoroughly now, you'll minimize errors and make the transition into xAssets smoother, regardless of which import method you choose.
Standard Import
The xAssets import process for standard imports is straightforward, especially when your data aligns with the provided format
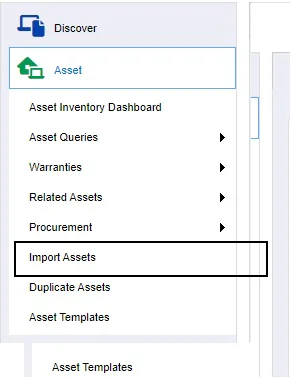
To begin a standard import, go to the Asset tab on the left side of the screen and select "Import Assets".
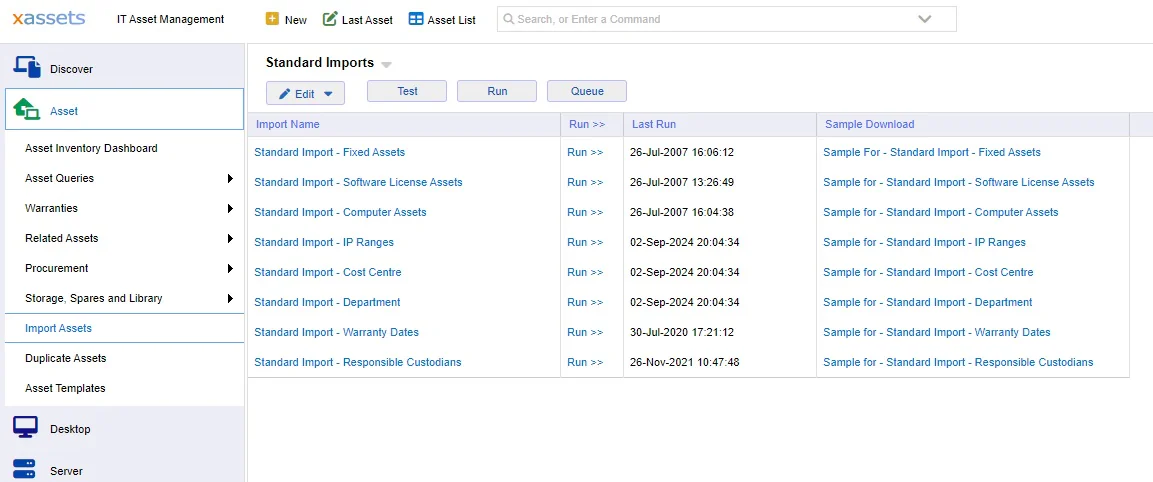
You'll then see the following screen:
Choose the "Run >" option for the import which best fits the type of assets you are importing.
A dialog pops up where you can paste your
formatted data directly from Excel into xAssets.
Clicking the "Sample" link on the right side of the list will download a sample spreadsheet showing the format needed.
Once you have clicked OK, the data is imported and you can review the results directly in the home page or in the list of assets:
If you have successfully imported your data, you're now ready to start managing your assets in xAssets,
and you can ignore the section below which is designed for customers with more complex spreadsheets.
Custom Import
For those needing more flexibility, you can build a custom import.
This option allows you to map your Excel data to any field in xAssets, including custom fields you've created for your specific business needs.
While this method requires a bit more work, it provides greater control over how your data is organized within the platform.
Don't worry if it seems complex—xAssets makes the process user-friendly, and our support team is always available to guide you through it.
Step 1: Prepare your data
Prepare your data as described above
Step 2: Create a new transformation for your custom import
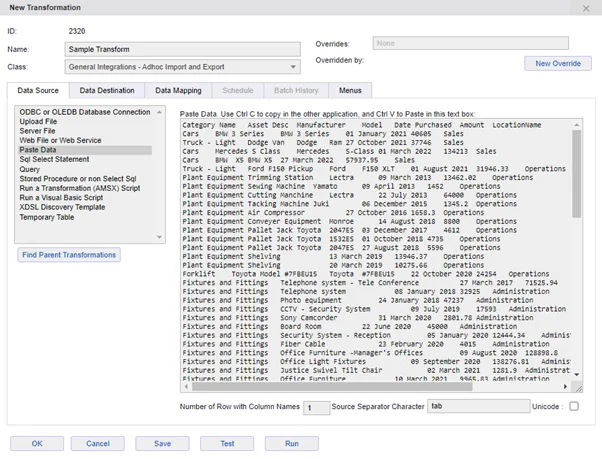
Click "Transformations" in the admin tab, and then select "Paste Data" on the left.
Paste your data into the large text box, and then click the "Data Destination" tab to proceed to the next step.
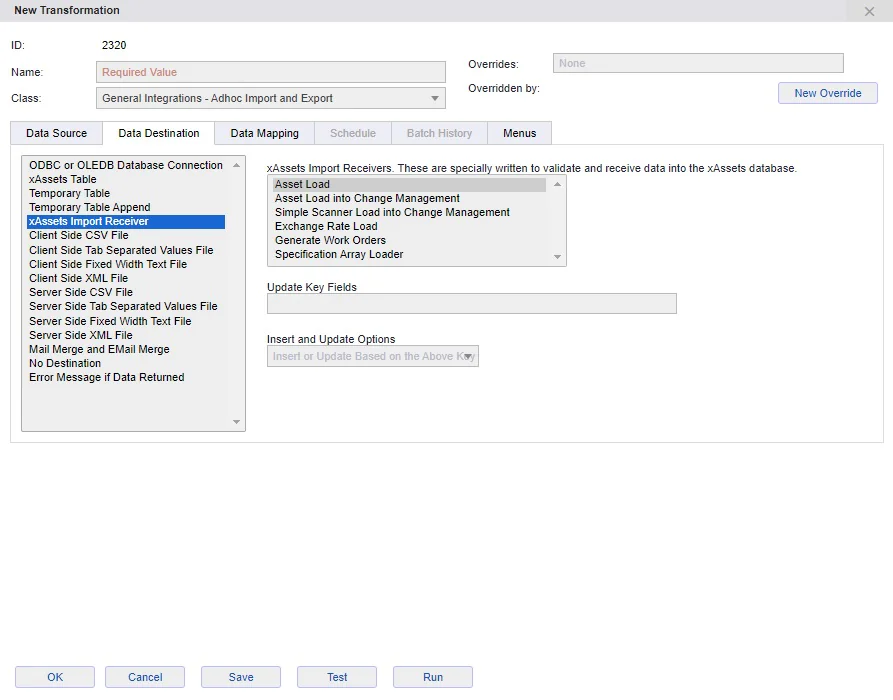
Step 3: Select xAssets Import Receiver as the data destination
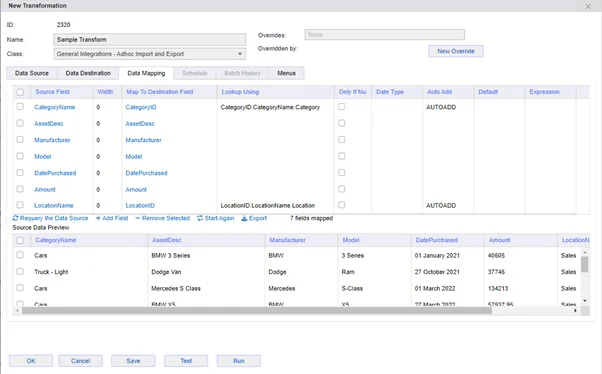
Step 4: Map Your Data to xAssets' Structure
Next, you'll need to map your Excel columns to the corresponding fields in xAssets. This is straightforward and can be customized to your liking:
- xAssets will map the field names it recognises. It uses an AI algorithm to match suitable field names based on meaning
- Map lookups such as Category and Location as "auto add", this will automatically add the lookup records for you during the import
- Check special fields: If you're tracking unique identifiers or custom asset properties, make sure these are properly accounted for in xAssets. You can set up custom fields in xAssets to track specific attributes like department ownership or lease terms.
Step 5: Import Your Data
With your data prepared and mapped, you're ready to import using either the standard or custom import methods:
Before you finalize the import, double-check the data preview to ensure everything looks correct. This is a great time to spot any inconsistencies or missing information. Once you're satisfied, click 'Run' to complete the import
And that's it! Your data is now in xAssets, ready to be managed more effectively than ever before. Once imported, you can begin to organize, categorize, and maintain your assets directly through the platform, enjoying the benefits of automation, real-time reporting, and improved collaboration.
Importing Complex Spreadsheets
xAssets can load almost any data format, and can handle complex data structures.
We can also "trigger" in processes to clean, recognise, de-duplicate, auto-add lookup values, and add child data such as transactions, parent-child relationships, and components.
The import engine uses a powerful scripting language to manipulate data, and can be used to load data from multiple sources,
and to load data from other systems such as databases, spreadsheets, and any systems on your network.
The import engine is also able to pull data from integrations such as Active Directory, Intune, SCCM, accounting system and other systems.
Summary
Switching from Excel to xAssets might feel like a significant change, but the benefits far outweigh the effort. With accurate record-keeping, improved collaboration, automated workflows, and real-time reporting, xAssets empowers your team to manage assets more effectively and with fewer errors. In fact, businesses that switch to asset management platforms like xAssets report better transparency, enhanced data integrity, and overall improved operational efficiency.
If you're ready to streamline your asset management process, follow these three simple steps to get started. And remember, xAssets offers customer support to assist you with any questions along the way. Don't hesitate to reach out for help ensuring a smooth transition.
Ready to see xAssets in action? We have free versions allowing 100 IT assets or 1,000 fixed assets perpetually,
and you can trial the software with an unlimited license.
Fill out the contact form on our website or send us a message