Creating a Dashboard
This page walks through creating a new dashboard, including how to set up the menu item, assign menu categories to cells, and optionally create sub-dashboards with tabs.
Prerequisites
- You must be a Configuration User.
- You should understand Dashboard Layout (rows, columns, and menu categories).
- You will need at least one Menu Category of type "Dashboard" to populate dashboard cells, and menu items within those categories.
Creating a Simple Dashboard
A simple dashboard displays links, charts, and tables in a single grid. To create one:
- Create the menu categories you need for the dashboard cells. Each cell requires its own menu category. Navigate to Admin > Menu Categories and create categories of the appropriate type.
- Add menu items to each category. Set the Display Type on each item to control whether it appears as a link, chart, or table (see Dashboards Overview for display types).
- Create a menu item for the dashboard itself. Navigate to Admin > Menus and create a new menu item.
- Open the Menu Command Builder tab and select "Display a Query" or "Display a Form" as the command type. For a standard dashboard grid, you will see options to assign menu categories to row and column positions.
- Assign your menu categories to the grid positions.
- Set the Menu Category of the dashboard menu item to the location where you want it to appear (e.g., in the main menu bar dropdown).
- Save the menu item and refresh the page to see the dashboard.
Creating a Dashboard with Sub-Dashboards (Tabs)
For more complex dashboards, you can create a dashboard container with tabbed sub-dashboards. Each tab is itself a dashboard with its own grid layout.
- Create a menu item for the top-level dashboard. In the Menu Command Builder, set the command to Display a Form. Select the form "Dashboard Container" and set the Script to "Dashboard Container Script".
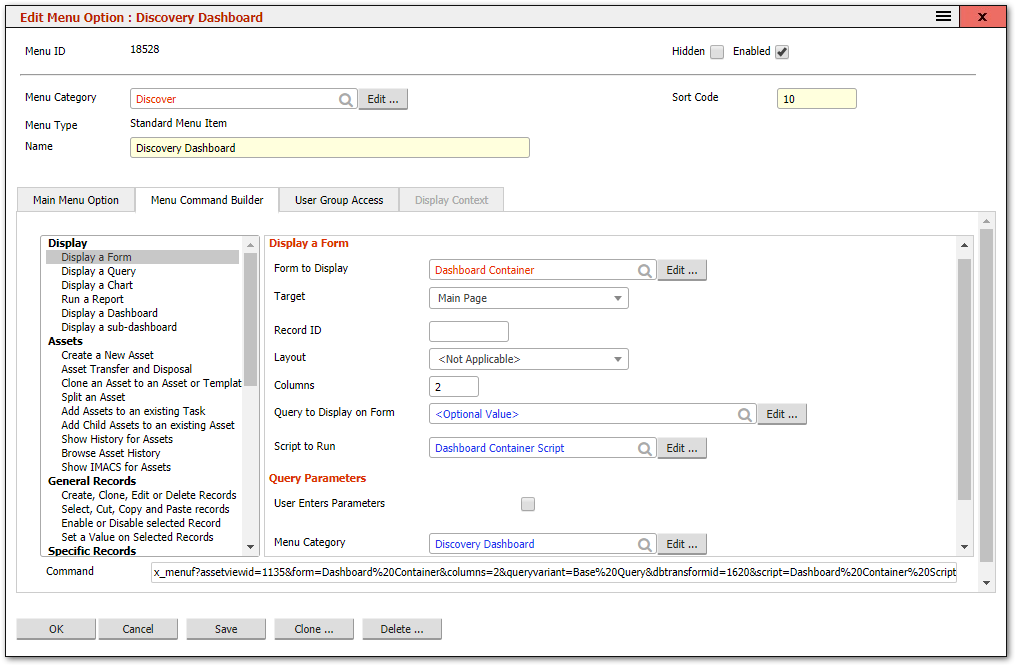
Set the Menu Category of this top-level menu item to a category of type "Dashboard Menu Item". This category will contain the sub-dashboard menu items (one per tab).
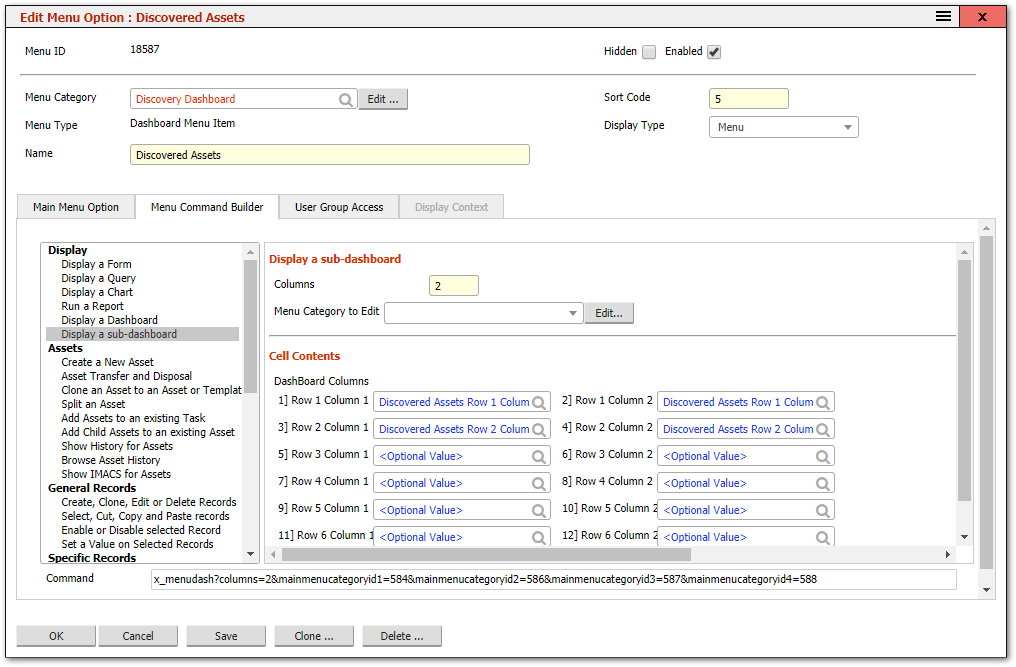
Create menu items for each sub-dashboard tab within that Menu Category. Each sub-dashboard is a standard dashboard menu item with its own grid of menu categories.
- Configure each sub-dashboard using the Menu Command Builder, assigning menu categories to row and column positions, just as you would for a simple dashboard.
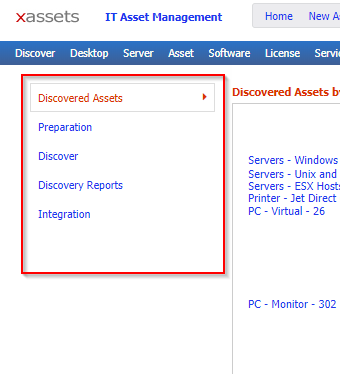
The result is a dashboard where users can switch between tabs, each showing a different set of charts, tables, and links.
Tips and Warnings
Tip: The fastest way to create a new dashboard is to find an existing dashboard that is similar to what you want, then clone its menu item and modify the copy. Examine the cloned menu's command to see how the grid and categories are set up.
Tip: If a dashboard cell should show a chart, make sure the underlying query has its presentation set to a chart type (bar, pie, line, etc.) in the Query Editor.
Warning: After creating or modifying a dashboard, you must refresh the browser page to see the changes. Dashboard layout changes are not applied live.
Warning: If you assign a menu category to a dashboard cell but that category has no menu items, the cell will appear as an empty space. Either add items to the category or remove the cell from the grid.
Related Articles
- Dashboard Layout — understanding the grid system
- Dashboards Overview — display types and how dashboards are assembled
- Menu Command Builder — building the dashboard command
- Menu Categories — creating and managing the categories that populate cells