Menu Access
This page explains how to control which menu items are visible to each user group. Menu access settings determine which navigation links, action buttons, and menu options users in a group can see and use.
Prerequisites
You must have Administrator or Configuration user group permissions to modify menu access settings.
How Menu Access Works
Each menu item in xAssets can be individually allowed or denied for each user group:
- If a menu item is denied to a user group, no user in that group will see it.
- If all menu items within a menu category are denied to a user group, the entire menu category is hidden from those users.
- Menu access is cumulative with other security controls -- even if a user can see a menu, table permissions still control what data they can access through it.
Configuring Menu Access
From the User Group Editor
- Navigate to Admin > Users > User Groups.
- Click a user group name to open the editor.
- Switch to the Menu Access tab.
- For each menu item, set the access to Allow or Deny.
- Save the user group.
Tip: You can copy the menu permissions from another user group using the copy option on the Menu Access tab. This is the fastest way to set up a new user group with similar permissions to an existing one -- copy first, then adjust the differences.
Using Ctrl-9 Visual Indicators
For a visual overview of what a user group can and cannot access on any page:
- Navigate to the page or dialog you want to inspect.
- Press Ctrl-9 on your keyboard.
- Select a user group from the dropdown selector:
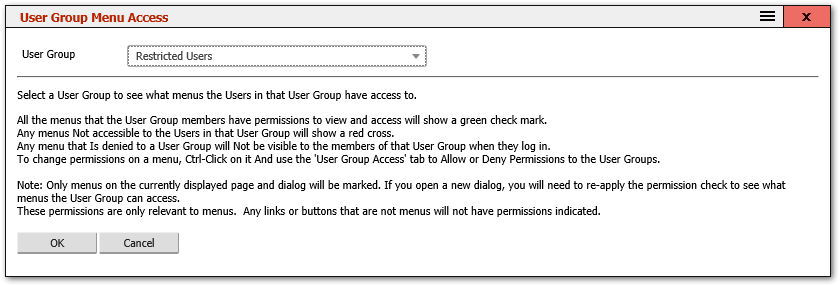
- All menus on the current page will be marked with indicators:
- A green check
 means the group has access.
- A green check
- A red cross
 means access is denied.
- Buttons and links that are configured to point to menus will also show the indicator.
- To remove the indicators, press Ctrl-9 again and choose the option to remove them.
Note: If you navigate to a different page or open a new dialog while indicators are displayed, press Ctrl-9 again to refresh the indicators on the new page. Scripted buttons and links will not show indicators because their permissions are not controlled by the menu access system.
Using Ctrl-Click for In-Place Changes
While the Ctrl-9 indicators are displayed, you can quickly change permissions:
- Ctrl-click on any menu item with an indicator to open the In-Place Menu Configuration dialog.
- Change the access permission for the selected user group.
- If multiple menus in the same menu category need the same access settings, make the change to one menu, then edit the Menu Category and use the option in the Menus tab to apply that menu's permissions to other menus in the category.
Common Menu Access Patterns
| User Group Type | Typical Menu Access |
|---|---|
| Administrator | All menus allowed |
| Standard User | Day-to-day operational menus allowed; Admin menus denied |
| Read Only | View and query menus allowed; edit, create, delete, and admin menus denied |
| Self-Service | Only the self-service portal menus and personal asset view allowed |
| Department Manager | Standard user menus plus reporting and approval menus |
Related Articles
- User Groups — overview of the user group system
- Editing a User Group — the user group editor dialog
- Table Permissions — controlling what data users can access (complements menu access)
- Menus — creating and editing the menu items that are being allowed or denied
- Menu Categories — how menus are organised into categories