Search Results
The Search Results screen (also called Asset List or Asset Search Results) is the primary screen for viewing lists of data throughout the application. Nearly every query, report, and data list -- assets, software, contracts, and more -- is displayed in this same grid. Understanding how to navigate, sort, select, and act on results is essential for productive use of xAssets.
Screen Layout
The Search Results screen has three main areas:
- Tree panel (left) -- a breadcrumb-driven hierarchy (for example Category Group > Category) with an All Items in Query link at the top. Click a tree node to filter the results to that node and its children; click All Items in Query to clear the filter. Drag the divider between the tree and the grid to resize it, or click the arrow at the top of the tree to collapse it.
- Results table (centre) -- the matching records in a grid with sortable column headers. Each row has a checkbox for selection, and key fields (such as the description, custodian, and computer name) are links that open the underlying record.
- Toolbar (top) -- Edit, Actions, and Discover dropdown buttons on the left; Format and Drill Up on the right.
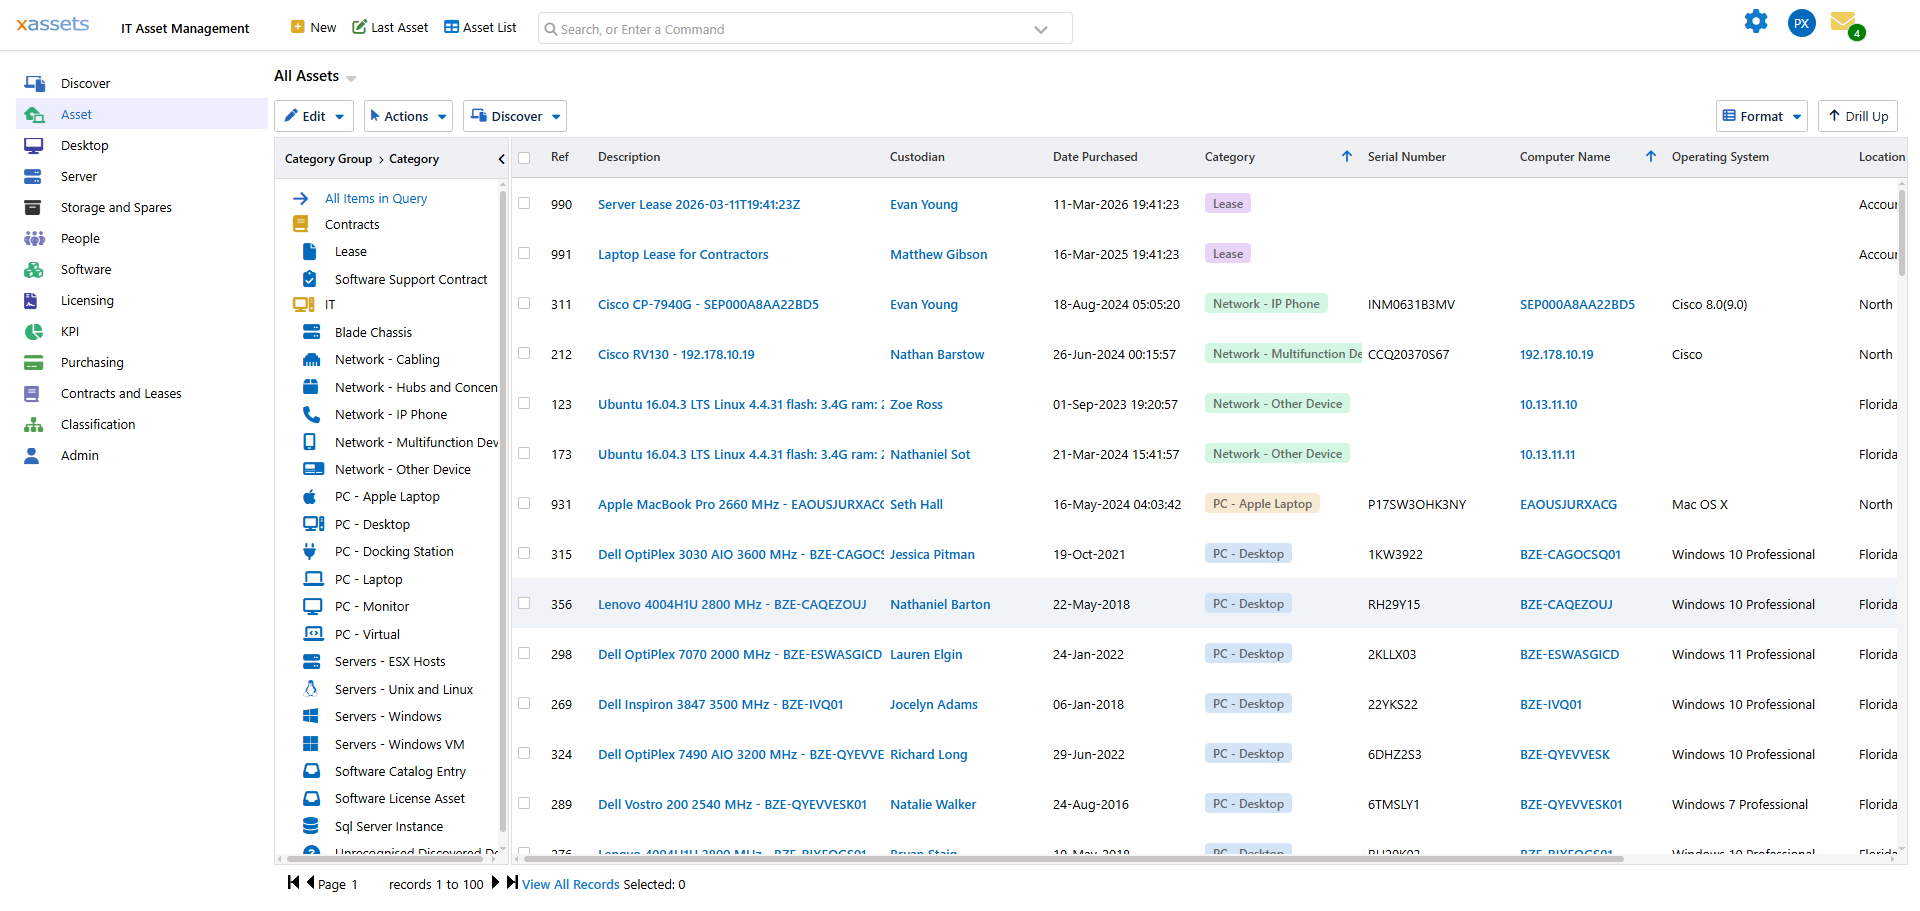
The Toolbar Menus
| Menu | Contains |
|---|---|
| Edit | Copy, Paste, Select All, Deselect All, Copy All Rows Shown, Copy Selected Rows, Copy Selected IDs, Refresh |
| Actions | Create a New Asset Like the Selected One, Bulk Update Assets in a Single Edit, Transfer, Service Desk, Dispose of or Delete Assets, Show Assets, Stored List |
| Format | Full Screen, Pie, Bar, Horizontal Bar, Network Diagram, Map, Table, Grouped Table, Tiles, Totals, Grouped Totals, PDF, Excel CSV, Email, Notifications |
| Drill Up | Moves the results up one level in the current hierarchy |
Key Actions
| Action | How |
|---|---|
| Sort by a column | Click a column header to sort ascending; click again to sort descending |
| Resize a column | Hover over the column border until the cursor changes to a resize cursor, then drag |
| Resize the tree panel | Drag the border between the tree and the results table |
| Filter by tree node | Click a tree node to show only assets in that node and its children |
| Remove the tree filter | Click All Items in Query at the top of the tree |
| Select records | Tick individual row checkboxes, or use Edit > Select All / Edit > Deselect All |
| Reclassify assets | Select records and drag them to a tree node. See Drag and Drop. |
| Build relationships | Drag selected assets onto a parent asset in the results. See Parent Child Relationships. |
| View as a chart or export | Click Format (top right) and choose Pie, Bar, Table, Tiles, PDF, Excel CSV, or another view |
| Bulk update selected records | Select records, then use the Actions menu (for example Bulk Update Assets in a Single Edit). See Bulk Update. |
| Drill up | Click Drill Up to move up one level in the hierarchy |
| Paging | Use the paging controls at the bottom of the screen (shown once results span more than one page) to page through results, or click View All Records to load the full list |
Sorting and Column Order
Click any column header to sort the results by that column. An arrow indicator shows whether the sort is ascending or descending. Click the same header again to reverse the sort direction.
The column order and which columns are displayed are determined by the query configuration. Administrators can customise these from Admin > Queries. See the Configuration Guide for details.
Paging
Result sets that do not fit on one page are automatically paged; the paging bar shows the record range (for example "1 to 25"), first/previous/next/last page buttons, and a page number field. You can:
- Navigate page by page using the first/previous/next/last buttons
- Type a page number to jump directly to it
- Click View All Records to load every record onto a single page (use with caution on very large datasets -- this may be slow)
Tip: If you need to select records across multiple pages, click View All Records first to load all results, then select the rows you need. Selections do not persist across page changes.
Your Place Is Kept
Refreshing the page, or coming back to it from a link, does not lose where you were. xAssets restores the state of the screen — your sort order, the tree node you had selected, the search text in the search box, and any filters you had applied.
This matters most part-way through a piece of work. Opening an asset from a filtered, sorted result set and coming back no longer means rebuilding the view; you return to the list as you left it.
To get back to the unfiltered list, clear the search box and click All Items in Query in the tree, rather than refreshing the page.
Viewing and Exporting Results
Click Format in the top-right corner of the results screen to change how the current results are displayed or to export them:
- Table / Grouped Table -- the default grid view, optionally grouped by a column
- Pie / Bar / Horizontal Bar -- chart views of the result set
- Tiles -- a card-based view instead of a grid
- Map -- a geographic view (where location data is available)
- Network Diagram -- a relationship diagram view
- Totals / Grouped Totals -- summary/aggregate views
- PDF -- generates a printable PDF report
- Excel CSV -- exports as comma-separated values for use in other tools
- Email -- sends the current view by email
- Notifications -- sets up a notification based on the current query
The export/format options apply to the full current result set, not just the visible page.
Tip: The Search Results screen is the most-used screen in xAssets. Selecting records first (via row checkboxes or Edit > Select All) then using the Actions menu is the fastest way to work on many records at once -- see Bulk Update.
Related Articles
- Finding Assets -- how to search for and locate assets
- Selecting Assets -- selection techniques for acting on records
- Query Results Display -- what happens when a query runs
- Bulk Update -- making changes to multiple selected records